
February 8, 2026
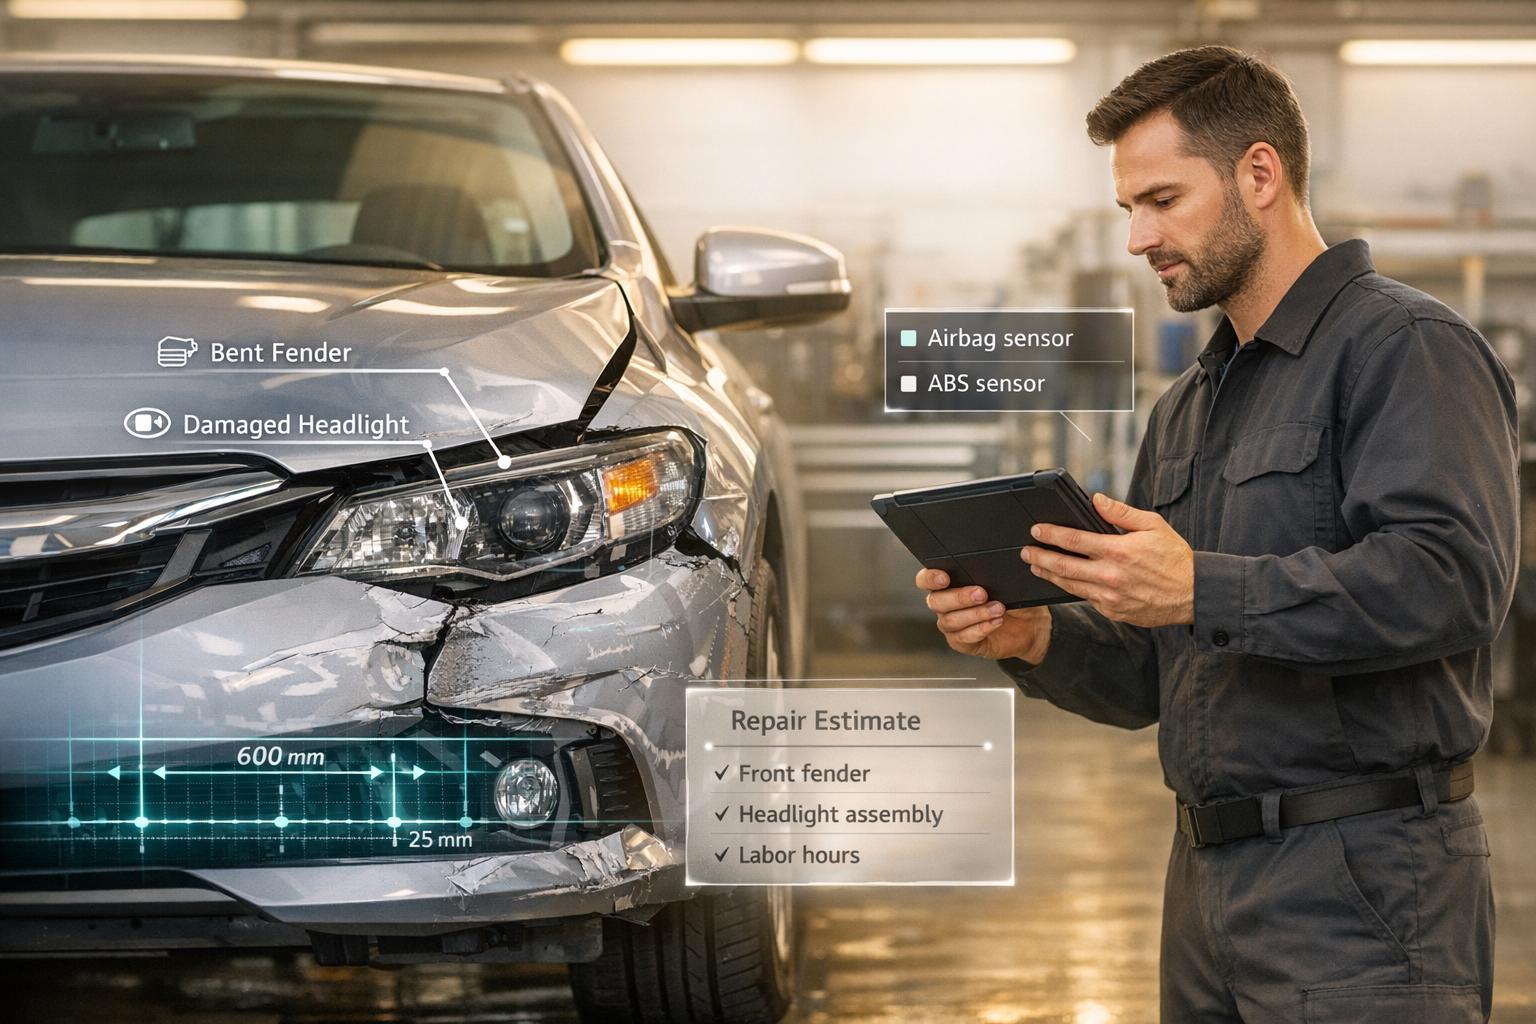
When your car is in an accident, visible damage is only part of the story. Hidden issues - like frame misalignments, electronic malfunctions, or damaged safety systems - can compromise safety and lead to costly repairs if overlooked. Auto shops follow a detailed process to assess collision damage thoroughly, ensuring your vehicle is restored to its original condition. Here's how they do it:
This step-by-step approach ensures that every issue - big or small - is addressed, prioritizing safety and compliance with manufacturer standards.
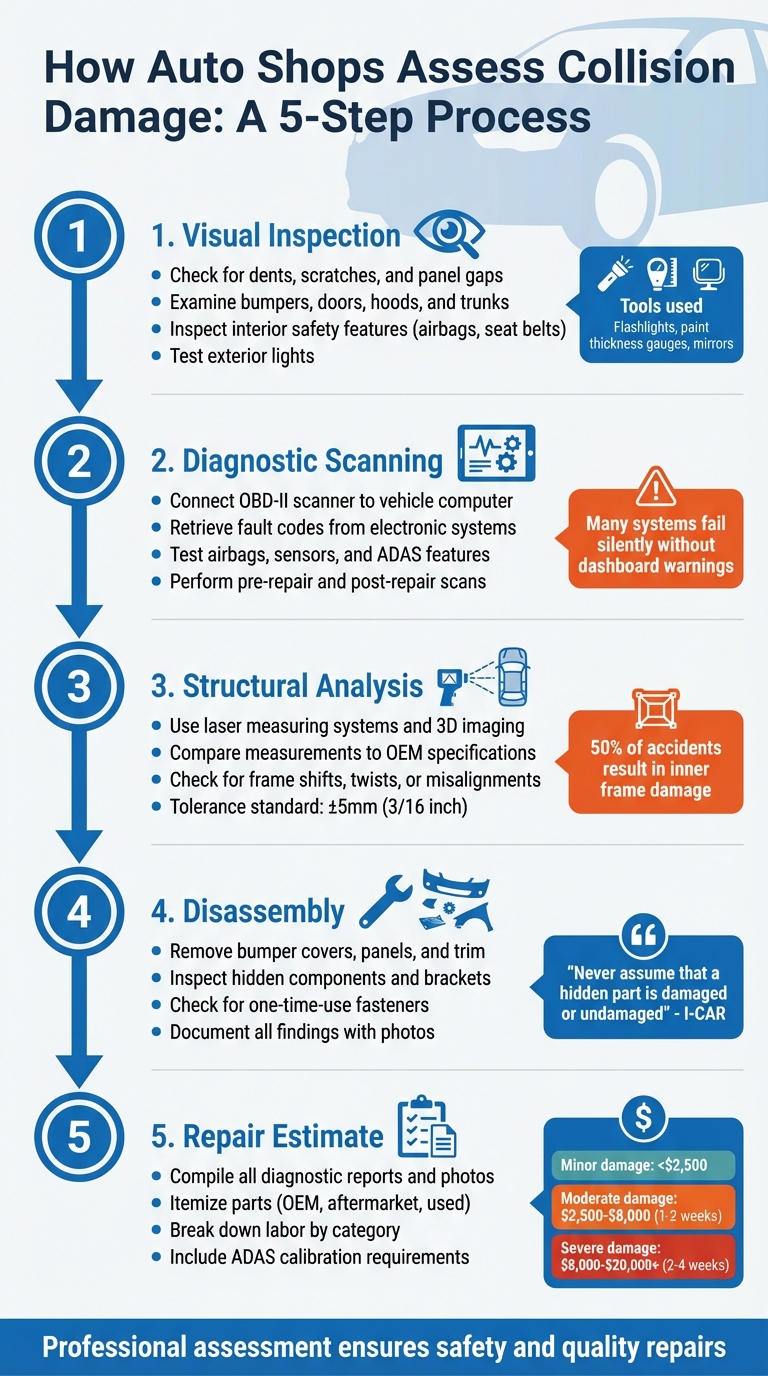
5-Step Auto Collision Damage Assessment Process
The visual inspection is where technicians start piecing together the story of the collision. This step is critical for identifying both visible and hidden damage. It begins with a conversation about the crash itself - questions like how fast you were going or if your car veered off the road. These details help narrow down areas where concealed damage might be lurking. From there, the technician conducts a walk-around, focusing first on the primary impact point and then tracing outward to locate any secondary damage. This process lays the groundwork for a more thorough inspection.
Every inch of the vehicle’s exterior gets a close look. Technicians check panels, trim, and surfaces for dents, scratches, or paint chips. They also examine gaps around doors, hoods, and trunks - uneven spacing here can indicate deeper structural issues like frame misalignment. Modern bumpers, for example, can appear undamaged after a collision as they spring back into shape, but the components behind them - like energy absorbers or mounting tabs - may tell a different story.
"Damaged bumper covers may return to the original shape immediately following the impact. For this reason, it is important to consider parts located behind the bumper cover that may be damaged." – I-CAR
Inside the vehicle, safety features take center stage. Technicians check for dashboard cracks, deployed airbags, and activated seat belt pre-tensioners. They also test exterior lights - headlamps, brake lights, and turn signals - to ensure everything is working as it should. If airbags have deployed or critical lights are out, the car is considered non-drivable until repairs are made.
Certain tools are indispensable for uncovering damage that isn’t immediately visible. Flashlights are used to illuminate hard-to-see areas, like under the hood or inside wheel wells, where cracks or leaks might hide. Paint thickness gauges are another key tool, helping to detect previous repairs or body filler that could complicate the current repair process. Mirrors and magnifiers make it easier to spot subtle deformations in tricky, hard-to-reach spots.
Technicians also examine panels from multiple angles to catch bends or irregularities that aren’t obvious when viewed straight on. To ensure nothing is missed, many repair shops wash the vehicle before the final inspection, removing dirt or grime that could obscure small scratches or inconsistencies in the paint. This attention to detail ensures a thorough assessment.
Once the visual inspection is complete, technicians turn their attention to diagnostic scanning. Modern vehicles rely heavily on computer-controlled systems, and even seemingly minor collisions can disrupt these sensitive electronics, sometimes without leaving visible signs of damage. To uncover these hidden issues, a scan tool connects to the vehicle's OBD-II port, allowing it to communicate with the onboard computer and extract trouble codes that reveal system malfunctions.
An OBD-II scanner plays a crucial role in the repair process. During the pre-repair scan, performed in the blueprinting phase, it identifies fault codes stored in the vehicle's computer. These codes help pinpoint underlying issues before any repair work begins. Steve Marks, Industry Technical Support Manager at I-CAR, emphasizes its importance:
"Without a diagnostic check, there isn't a way to identify hidden damage to today's advanced vehicle electronics and driver assist systems. Especially since there are a significant number of systems that don't provide a visual indication that there is a system malfunction or history code of some type."
By distinguishing between pre-existing issues and collision-related damage, the scan ensures an accurate repair estimate. After the repair work is complete, a post-repair scan acts as a final check, confirming that all collision-related codes have been resolved and that the vehicle's systems are functioning as they should. Some repair shops now take advantage of remote diagnostic services, enabling vehicles to connect with off-site master technicians for OEM-level scans. This eliminates the need for every tool to be available in-house while still ensuring precise data to guide both repairs and quality checks.
Once fault codes are retrieved, technicians move on to testing the accuracy of sensors and the functionality of safety systems. These scans ensure that critical features - like airbags and advanced driver assistance systems - are recalibrated and working as intended. Even components that appear intact, such as bumper sensors or side mirror cameras, may require zero-point calibration after being removed and reinstalled to restore them to factory settings.
Mitchell, a collision repair software provider, highlights the risks of skipping these steps:
"If a blind spot detection system is off by even the slightest amount, it may mean the driver is not alerted to a motorcycle in the lane next to them."
Because many systems fail silently - without triggering dashboard warning lights - diagnostic scanning is essential. Additionally, some recalibrations demand very specific conditions. For instance, aligning a 360-degree camera on a 2015 Ford F-150 requires a flat, open area with precise measurements: at least 6 feet of space on the sides, 7 feet in front, and 11 feet behind the vehicle, free from shadows and glare. These meticulous steps ensure the vehicle's safety systems are restored to their original performance.
Once the diagnostic scanning is complete, technicians shift their focus to the vehicle's chassis. Nearly 50% of accidents result in damage to the inner frame, which can compromise safety in significant ways. This step ensures that any hidden structural issues are identified, even when the exterior panels appear undamaged. A chassis that’s shifted, twisted, or bent can affect both the vehicle’s handling and its ability to protect passengers in future collisions.
Advanced tools like laser scanners and 3D imaging systems play a critical role in this process. These systems create detailed digital maps of the chassis by measuring key dimensions: height from the "datum plane", width from the centerline, and length using factory-defined control points. By comparing these measurements to the original equipment manufacturer (OEM) specifications, technicians can detect even the smallest misalignments.
To correct these issues, a frame bench is used alongside hydraulic winches, clamps, and chains. These tools work together to pull damaged sections back into alignment with factory standards. Precision is critical - while older vehicles allowed for a 3 mm build tolerance, many modern vehicles are designed to meet a "zero tolerance" standard. According to I-CAR's Uniform Procedures for Collision Repair (UPCR), technicians should adhere to manufacturer specifications or a tolerance of plus or minus 5 mm (roughly 3/16 inch) when no specific guidelines are provided. At Franklin Auto Body, our cutting-edge equipment ensures these exacting standards are consistently met.
With these precise measurements, technicians can identify even the most subtle structural deformations that might otherwise go unnoticed.
Structural damage isn’t always obvious at a glance, so technicians look for specific signs of hidden issues. For example, a "diamond" condition occurs when one side of the frame has shifted, while a "twist" indicates uneven rail heights. "Side sway" points to lateral misalignment, and "sag" reveals vertical displacement of the rails. As Certified Collision Center explains:
"It can be hard for the human eye to visually see minor frame damage, so utilizing a machine helps an auto body repair shop determine without a doubt whether the damage is present or not."
The impact from a collision often sends energy through the vehicle like a ripple, potentially misaligning components far from the initial point of contact. Technicians carefully inspect for creases in the metal, buckled seams, or cracked undercoating near mounting points - areas where damage can easily be hidden under the surface. For severe impacts, shops may take 6 to 8 measurements under the floor, rather than the typical 4, to uncover rare but critical issues like tunnel twist or sag. This thorough structural evaluation ensures the vehicle’s foundation is solid before moving on to further repairs.
Once structural analysis is complete, technicians move on to disassembling parts of the vehicle to uncover damage that might be hidden beneath the surface. Collision forces can travel in unexpected ways, often leaving issues concealed until this step. As I-CAR explains:
"Disassembly may be required to identify all damage... Never assume that a hidden part is damaged or undamaged."
During this process, technicians meticulously document all findings to refine and update the repair plan.
The disassembly process is tailored to the area of impact, with certain parts requiring closer inspection. For front-end collisions, technicians remove the bumper cover to assess the energy absorber, reinforcement bar, and brackets. Additional nearby components, such as the grille, headlamp assemblies, and fog lamps, are unbolted to examine the radiator support and lower rails for cracks or misalignments.
In the case of side impacts, fenders are removed, and fender liners (splash shields) are pulled back to expose critical areas like the apron and rails. Door assemblies often require the removal of interior trim panels and moisture barriers to inspect intrusion beams, latch mechanisms, and side impact sensors. Technicians may also remove adjacent parts to improve access or protect them during repairs. While federal standards require bumper assemblies to withstand impacts up to 2.5 mph without damage, higher-speed collisions often reveal additional issues during disassembly.
Another critical step is identifying one-time-use fasteners, which must be replaced after removal. Special attention is also required around Advanced Driver Assistance Systems (ADAS), such as radar sensors behind grilles or blind-spot monitors in side mirrors. Moving these components often means recalibration is necessary.
As panels and parts are removed, every new finding is carefully documented. Technicians use photos, checklists, and digital tools to capture hidden damage and subtle deformations. For example, digital photos and 3D scans record structural issues, while scan tool printouts and worksheets track electronic faults and vehicle dimensions.
This documentation is essential for updating repair estimates and maintaining clear communication with both the customer and the insurance company. I-CAR stresses the importance of this step:
"Inform the customer of any changes in the repair plan from the original repair agreement, and explain the changes and why they have to be made."
At Franklin Auto Body, our team prioritizes transparency throughout the disassembly phase. We keep customers informed about every discovery and explain why additional repairs are necessary. By identifying and documenting damage early, we create a more accurate repair plan and minimize the need for later adjustments.
Once all damage has been identified and documented, technicians move on to creating a detailed repair estimate. This step, often referred to as compiling data, involves pulling together diagnostic reports, photos, measurements, and parts lists to form a comprehensive repair plan that leaves no detail overlooked. Steve Marks from I-CAR highlights the value of this thorough process:
"Checking for diagnostic trouble codes (DTCs) during blueprinting may help to avoid 'time bandits' (supplements, last-minute sublets, etc.) later in the process."
By addressing all potential repairs upfront, shops can deliver accurate estimates and avoid unexpected surprises down the line.
To ensure nothing is missed, technicians rely on industry-standard software like CCC Intelligent Solutions, Mitchell, or Audatex to document every repair need. The estimate is broken into specific labor categories - such as body work, structural repairs, frame straightening, mechanical tasks, and painting - with each task itemized and billed separately. Parts are also categorized by type, whether they are Original Equipment Manufacturer (OEM), aftermarket, or used (LKQ), with costs reflecting the specific part type.
Modern estimates also incorporate diagnostic data to capture every fault code. For vehicles equipped with Advanced Driver Assistance Systems (ADAS), the estimate includes calibration procedures and specialized equipment, as even components like side mirrors may require intricate "zero-point calibrations" using calibration mats. Additionally, technicians carefully review the vehicle's materials and OEM repair guidelines to ensure the appropriate tools and techniques are used. Detailed photos and imaging are included to support each repair decision.
Once the estimate is complete, clear communication with the customer becomes the next priority. Shops provide an itemized breakdown of costs, detailing the expenses for both parts and labor. At Franklin Auto Body, for instance, we walk customers through each line item, explaining where their money is going and why specific repairs are necessary. In cases where extensive hidden damage is suspected, we might recommend a formal teardown estimate. This agreement outlines the cost of disassembling and reassembling the vehicle if the customer decides not to proceed with full repairs.
Transparency is key throughout the entire process. As the Bureau of Automotive Repair states, "Keeping the customer informed throughout the entire estimating, teardown, and repair process is essential". Shops often share diagnostic reports and photos to justify the repairs, especially for critical systems like airbags and ADAS sensors. If further damage is uncovered during disassembly, the estimate is updated, and the customer is immediately notified before any additional work begins.
The final estimate also includes a timeline for the repairs, based on the severity of the damage. Minor repairs, such as small scratches or bumper damage, usually cost less than $2,500. Moderate damage, which might involve structural work or ADAS repairs, typically ranges from $2,500 to $8,000 and takes about one to two weeks. Severe damage, affecting the frame and multiple systems, can cost $8,000 to over $20,000 and may require two to four weeks to complete. This level of detail ensures customers understand the repair plan and how it aligns with safety and quality expectations.
Assessing collision damage is about much more than just identifying visible dents or scratches. As Steve Marks from I-CAR emphasizes, "Without measuring, it isn't possible to determine the extent of damage, or to identify hidden damage – which can impact the safety of drivers and passengers in future accidents". Modern vehicles require a detailed and methodical approach, combining visual checks, diagnostic scans, structural measurements, and even disassembly to uncover less obvious issues.
This is where professional expertise becomes essential. Shops equipped with tools like advanced 3D scanners, OBD-II diagnostic systems, and those following strict OEM guidelines can identify subtle frame misalignments and hidden electronic or structural problems. Without this level of precision, a vehicle could leave the shop with unseen flaws - compromising its safety features or structural integrity, which could lead to serious risks on the road.
At Franklin Auto Body in Boise, Idaho, our I-CAR GOLD CLASS certified technicians use this meticulous process for every vehicle we service. With state-of-the-art diagnostic tools and strict adherence to manufacturer standards, we ensure your car is restored to its original safety specifications. From the first visual inspection to the final system checks, we document every step and keep you updated throughout the repair process. Your safety is always our top priority.
Auto body shops use specialized tools and methods to spot damage that isn’t immediately visible after a collision. One key tool is the computerized measuring system, which checks for frame misalignment by comparing the vehicle’s dimensions to the original factory specs. This helps technicians catch even the slightest structural issues that could otherwise go unnoticed.
Beyond just looking for visible damage, technicians also conduct diagnostic scans to uncover problems in electronic systems like airbags, sensors, and other safety features. They also test mechanical components like the suspension and steering to detect any unusual noises, vibrations, or alignment problems. These detailed inspections ensure your car is not only repaired but also safe and dependable, just like it was before the accident.
Diagnostic scanning plays a key role in keeping modern vehicles safe and efficient. It digs deep into a car's electronic systems to uncover issues that a simple physical inspection might miss. This means that critical safety features - like airbags, lane assist, and other driver assistance systems - can be checked to ensure they’re working properly after repairs.
As vehicles become more advanced, these scans have become essential for technicians. They help identify errors, reset system codes, and confirm that your car is safe to drive. It’s a vital step in making sure your vehicle performs as it should while keeping you and others on the road protected.
Auto repair shops use cutting-edge tools to achieve precise frame alignment after a collision. Computerized measuring systems, equipped with 3D scanners and lasers, allow technicians to identify even the tiniest misalignments. By comparing the vehicle's frame to the original manufacturer specifications, these systems ensure repairs are both precise and based on accurate data.
For the actual straightening process, shops depend on hydraulic frame machines. These machines apply controlled force to realign bent or twisted sections of the frame. They securely hold the vehicle in place while restoring its original shape. Combined, these technologies ensure the vehicle's structure is properly aligned, safe, and road-ready.
